JMS Adapter (Draft)
Sun micro-system (now oracle) with several other technology companies has written down the specification for the Java messaging system. This include API for the message exchange and also specification for the message production and consumption. On the top of it sun built the complete APIs in java for the JSM to use it.
It become a very favorable way of integration between the heterogeneous systems and also between the systems where communication is not synchronous. Its also pawed the way of one to may kind of integration. Where one or many system wait for the producer system to notify the change and then subscribing system work and do the activity in its part.
In Oracle SOA suite JMS capability is inbuilt and it use weblogic server as a messaging container. Hence its the weblogic queue or Topic which is used by SOA suite for the message transport.
I will take difference between queue and topics in the next post but here we will be learning how to use JMS adapter in SOA suite.
Application Process Creation
1. This adapter abstract all the complexity of the implementation of the JMS to developer. First create an application with the BPEL process. You can keep name as same or can change names. Use the xsd given for the input. I am sick of employee department model hence choosing a different one here.
XSD : download the xsd from the project url.


It become a very favorable way of integration between the heterogeneous systems and also between the systems where communication is not synchronous. Its also pawed the way of one to may kind of integration. Where one or many system wait for the producer system to notify the change and then subscribing system work and do the activity in its part.
In Oracle SOA suite JMS capability is inbuilt and it use weblogic server as a messaging container. Hence its the weblogic queue or Topic which is used by SOA suite for the message transport.
I will take difference between queue and topics in the next post but here we will be learning how to use JMS adapter in SOA suite.
Application Process Creation
1. This adapter abstract all the complexity of the implementation of the JMS to developer. First create an application with the BPEL process. You can keep name as same or can change names. Use the xsd given for the input. I am sick of employee department model hence choosing a different one here.
XSD : download the xsd from the project url.

2. Now add the xsd from the project given and then drop an BPEL component on the canvas.


If you are not sure how to select input use below screen to check.

3. Now the BPEL process will be created as given below and you are fine to create an adapter.

JMS Adapter Creation
1. Drag and drop and adapter from the BPEL components to SOA canvas. it will start the Wizard for the JSM adapter creation. Give a name to the Jms adapter and say next.

2. Now choose the provider for the jms connection, in the previous chapter we created JMS connection on weblogic. Use that, for more information visit my previous post.

Skip Step 3 -
3) If connection to the server is not already created then it will invoke the other wizard to create and add a new weblogic connection for the JMS connection to use.

4. Provide user name and password for the weblogic connection and click Next.

5. Provide the IP address or host name for the weblogic server and and click next.

6. After testing the connection click over next and then Finish.

7. Now choose the application server connection. This is connection we need to first created in weblogic server.

8. Now for adapter interface that it will be defined later and choose next

9. In this step JMS adapter will ask if you want to produce or consume the message, based on this other configuration will be created.

10. Now we add the queue and name to message queue and click next.
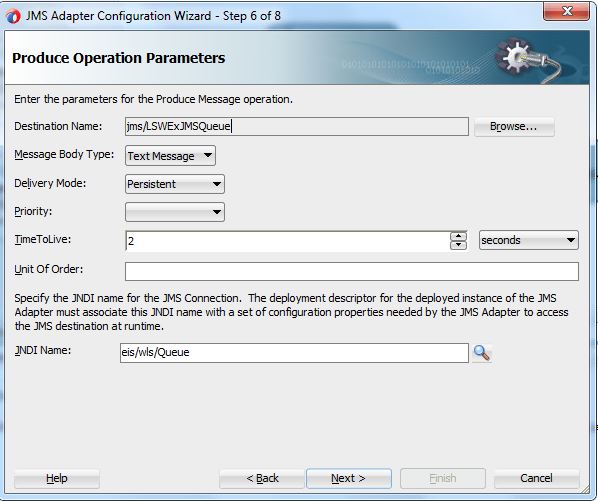
11. Now add the xsd, this is the same xsd which we have used to create the BPEL process, click next post that.

12 Now review the setting and finish it, it will create JSM adapter in the background for you.

13. Once adapter come on canvas join it with BPEL process, with wire it should look exactly same as given below.

Consumer JMS Services
1. Now we are creating one more adapter this is for consuming the message been queued by the first adapter.

2. Name the adapter as given blow, please keep in mind we are creating this adapter for the message consumption, for the message created using the JMS adapter.

3. Select the provider as weblogic and click next.

4.. Now select the connection, this is same connection we created and selected in this exercise and click next.

5.Now operation we are going to perform is Consume message select as required and then click next.
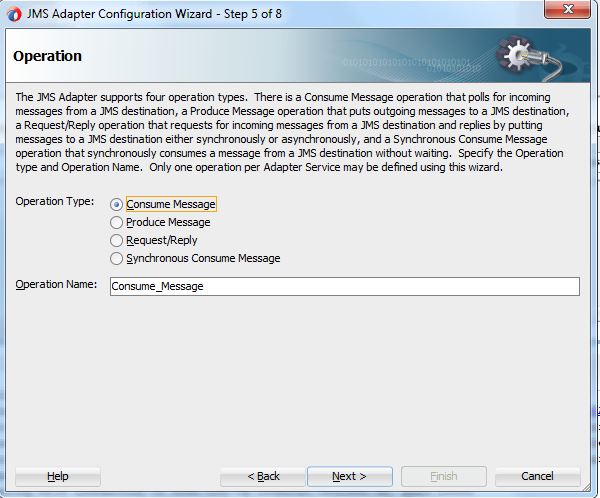
6. Select the queue which is going to be used and then click next.

7.. Now choose the xsd, from the project, its expected structure of the message, once selected click next.

8. Now click finish and then Jdeveloper will create the JMS adapter for you.

9. Add one more BPEL with the same input type and wire it with the consumer JMS adapter. Now deploy this composite on SOA server and your project is ready to test.
Testing of Composite
1. Go yo you composite and select it and click on it.

2. Click on the test service button and then input the parameter and click on test button.

3. Check the flow trace you will be able to see both consumer and producer.