Custom Header in BPEL
Some time we want to send process a message which is not part of the soap message, like an example we got a message(payload) from a accounting system and this accounting system want to send the information to next system(broker) to tell which is the customer to which this system has to call by the broaking service.
There are multiple times situation may come that you want to pass the payload to another service but without modification but want some information to be passed. Cryptic, yes but this can be done using the headers, hence we will not be changing the payload but sending the information in header.
Application Creation
1. Open the jdeveloper and create a SOA application.

2.Name the application BPELCustomHederDemoApp. you can choose any of you name too but in that case please proceed with that name.

3. Now create a project inside the application I named it BPELCustomHeaderProj, you can have a name of your choice.


5. Application will be created with in jdeveloper, once you are done with the finish.

Schema Addition
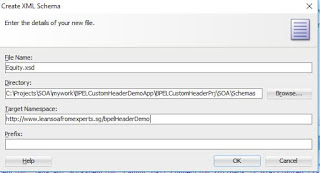
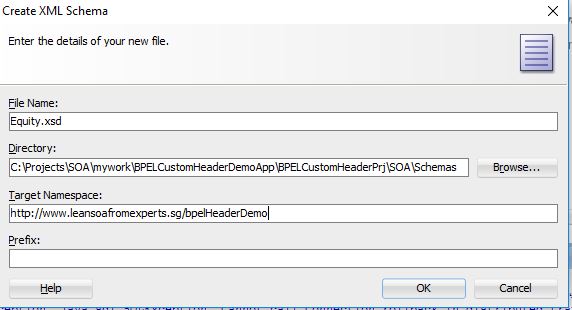
1. Now add the schema file to the project,please create xml schema name with Eqity.xsd and then copy the schema from the project.

BPEL Creation
1. Open the composite and drag and drop a BPEL component from the component menu.

2. Now name the BPEL and then took input as equity and same as output, we are creating it as request response (sync) process.

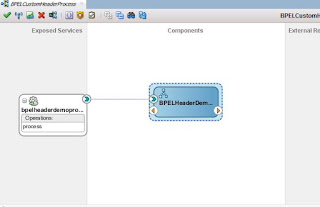
3. Once you finish it will create the BPEL and its calling service like given in the picture.

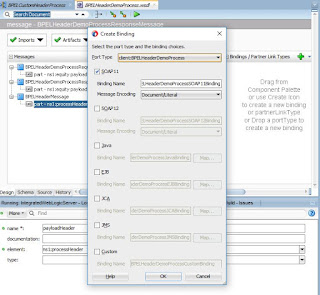
 6. Now click on bindings and create binding and just finish it. It will start reflecting in the wsdl file.
7. It will look like this once created.

8. Now open the wsdl and add header in the input and output of the BPEL process.

 10. Now open the BPEL and create the variable name inputHaderVariable and outHeaderVariable and add type of the element as given below.

11. Now things are created and in the receive edit it and then add the header variable as inputHeaderMessage variable, which is just created.
 12 . Now add a assign activity and set the header of the instance. It will give us what is been sent in the header variable.
There are multiple times situation may come that you want to pass the payload to another service but without modification but want some information to be passed. Cryptic, yes but this can be done using the headers, hence we will not be changing the payload but sending the information in header.
Application Creation
1. Open the jdeveloper and create a SOA application.

2.Name the application BPELCustomHederDemoApp. you can choose any of you name too but in that case please proceed with that name.

3. Now create a project inside the application I named it BPELCustomHeaderProj, you can have a name of your choice.

4. Create a empty composite, we will be adding component to it later.

5. Application will be created with in jdeveloper, once you are done with the finish.

Schema Addition
1. Now add the schema file to the project,please create xml schema name with Eqity.xsd and then copy the schema from the project.

BPEL Creation
1. Open the composite and drag and drop a BPEL component from the component menu.

2. Now name the BPEL and then took input as equity and same as output, we are creating it as request response (sync) process.

3. Once you finish it will create the BPEL and its calling service like given in the picture.

4. Open the wsdl file created for the BPEL and add a message in the WSDL name BPELHeaderMessage and say ok

5. Add part message to it and now select the processHeader to the message, name it payloadHeader.


7. It will look like this once created.

8. Now open the wsdl and add header in the input and output of the BPEL process.

9. Once its been added and you open the wsdl in design mode it will look like below.


11. Now things are created and in the receive edit it and then add the header variable as inputHeaderMessage variable, which is just created.


Test
1. Now start the server and deploy composite, please see my post for more information. Once deployed open the test console and then open the composite for testing.


3. Now check the output and you will be able to see that header sting been assigned to string name.


4. Last but not lest check the header variable and see the name there. it is there been set as instance name also.
Download the project from this location
Activity :-
Change the XSD and make it to create an employee and send the company name in header.