Tuesday 31 May 2016

Xquery in SOA Suite 12C


XQuery in SOA Suite 12c. 


We are going to take Xquery in the SOA suite 12C. Right now, there are many blogs which tells you difference between the Xquery and Xlst. Xlst engine is available with SOA but xquery is a new entrant to Oracle SOA with 12C.

We are first trying to set the difference between the xlst and xquery.  
Context XSLT Xquery
Logic Xslt is a data driven technology, It transforms one form of data into another but its a data based transformation.  Xquery is also used for transformation but it mostly logic  based transformation.
Datausing Xslt make more sense when we need to transform almost all the data from one form to
another.
Xquery not normally give any additional advantage when transformation is just of structure. But when its required to pick up
any specific data then it gives us additional benefit.


In some of the post users have told that performance of both the transformation technique is much different in different environment, but when it comes to weblogic and for doing the bulk data process both are same, we are in this example using xquery to perform some logic.  


   There is nothing as such good or bad in both the technology, but yes there are different pros and cons of using it.  Please download the application from the url and run it from the xml given in the test suite folder.

This application is a simple application, which accept multiple employees and provide the max and sum of all the salaries.

We have shown both the ways to do this activity, first is the Xquery and second is xlst.  In some post i have seen that xquery was part of SOA 11g, But during my work I have not seen it, it was part of OSB but not the BPEL.


   Xquery : -  Its again an componet, for which reference goes in the BPEL file, Xquery file is created as a part of your BPEL process. One thing we should remember, reference files normally be executed in there separate engines.


  A number of options you can see which you can use in the xquery.  These options anyway more then the xlst.


Application :-

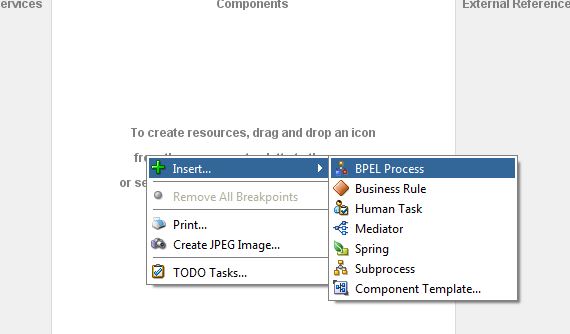
     Open the application in the jdeveloper 12c and deploy it, use our previous post if you are not sure how deploy a soa composite.


   One Application is deployed, we can execute is using the EM console or SOAP UI. 


 Execution:- 
     
    1. Open the instance and see the flow of the application it will look like below.


2.  This is what xquery, has processed.


This example is for the basic of xquery, but you can play with example to get some advance feature.


Reference:

http://www.xml.com/pub/a/2005/03/09/xquery-v-xslt.html

Wednesday 25 May 2016

Sub Process in SOA 12C

 Sub Process in SOA 12C


Subprocess to me is one of biggest addition to the SOA 12c.  In orchestration if we want some part of the code to be executed again and again and in different part of a BPEL process, in 11g we just have a simple choice, we need to create a separate BEPL for it and then we need to call it a service but that again create multiple issues first we need to deal with the two different processes.  


12c comes with a solution called sub process, In this example we have created a subprocess, which provide us if the employee salary and his level is correct. If not it provide us the error and based on employee experience we again retry to calculate his level and try to validate again with the same process, if validated then fine else it will throw an error.


Please download this program from the url, and open it in jdev. Deploy to the integrated server and run it.

Important part of the sub-program.

1. In the composite it very much similar to a BPEL process, which is wired with a BPEL process for the call.  In this Example EmployeeSalaryValidation Subprocess is been wired with the BPEL process.


2. In 12c a new activity is been added which is subprocess call, it allow us to call a subprocess, once added it will display all available subprocesses and then we can choose which one we want to call.


 3. It also provide the functionality call by values or call by reference. Call by value does not change anything in the calling BPEL process but reference modify the values in the calling flow also.


4. Sub process does not have any initiating activity. Its almost a fragment of BPEL process. Only parameters passed to subprocess are available to it.


Execution

1. Once process deployed it can be executed normally in the EM.


2. Once process deployed it can be executed normally in the EM, you can see the result as subprocess in the Bpel call tract.


3. Here the input and output from the process is document.


 Play with the process to get full understanding of the subprocess and all questions are welcomed.

Saturday 21 May 2016

File Adapter - Sync Read - SOA 12C


   Sync Read and write using DB Adapter

This is the second post about the file adapter, please refer the first post of the file adapter to get more information about the file adapter.  We are going to talk about the sync read property of the file adapter.

File adapter use poll mechanism to observe if any file been uploaded to the current folder or not. But there could be cases when we need file to read only when user initiate the process.


Here we need sync property of the file adapter to rescue. Sync property allow file adapter to work as a service which start when its been called. Please download the application from the url for more info.


In Sync read file adapter need exact file name (No pattern) to read. Which make sense as during the sync read operation it should have to provide the file name.

Here are some screenshots of the file adapter.


Here are screenshots of adding a file adapter in sync mode to composite.


1. Adding file adapter to composite.


2. Name your adapter.


3. Keep default and click next.


4. Keep the default and say next.


5. This is important here we need to choose Sync Read file.


6. Now provide file where we need to read and where to archive.


7. Now give exact file name here.


8. Now choose the xsd which will be driven from the file.


Please revisit the application and see the different component there.


Now you can put the sample from the testSuite to the input folder and post that you can instantiate the process from EM or from the SOAPUI.


it will read the records and will provide you total number of count.


Execution & Testing 

1. During the execution you can see the file trace as given below. This will reflect as normal service call.


2. If you open up the reply of the program it will tell you total number of employee in the file.


Please let us know feedback also, we want to know the area of issues we will definitely cover in next blogs.


Thursday 19 May 2016

Deploying a SOA MDS project to Weblogic


     Deploying MDS artifacts to weblogic Server


  This post is the next post in the sequence of using MDS in SOA. Please have a look on first post for more clarity.

Now in this post we will talk about deploying application having all the soa artifacts. It will make all the schema's wsdl or policy files will be available through out the components. 

 We need a new application for this, Hence create a generic application for this purpose, this application will contain all the SOA shared artifacts and will be deployed to weblogic server. 


 Here are steps to create this application. 


1. Create a generic application and custom project. 


 2. Provide an name to the project 
 3. Now go to project properties and open the project property.


4. Add a new deployment jar file and then give any name to this jar  


5. In the deployments --> Contribution add the app folder of the matadata location after it ask 


 6.Now all set from project side starting with the changes in application.


Application Deployment


1. Now go to application and then click on properties.


2. It will open the deployment window now add a new deployment profile and give a name, type must be SOA Bundle.


3. Once added click ok and now select the jar which we have created in our first step. 


     4.  Now click ok and your SOA bundle is ready for deployment. Deploy it to weblogic server.


We will upload the project and how to test this functionality in next blogs ... :-) keep following us.


Wednesday 18 May 2016

Meta Data Store(MDS) Setup in Oracle SOA Suite 12C

                     Meta Data Store(MDS) Setup in Oracle SOA Suite 12C


In SOA governance one of the very important aspect of big to medium SOA projects. Solution designer has to keep a check on the schemas and wsdls been used in the multiple projects and there are sure shot chances if teams are working in isolation and different location.  

 One good practice is to have a repository of all the artifacts like schema and wsdls and then ask every member to use it.  This can easily been done by MDS  repository.  Hence first we build different schema of the project and then keep it in the repository and each project should not have there own schema. 


 In this post we are going to discuss how to create a metadata repository and how to use and deploy it to your server for reference. 


 Creating File Based MDS:

  Its advised to use db based MDS due to higher accessibility. But still just to get a hands on we are using file based MDS in this example. 

1. Create a folder in the filesystem which will act as a repository, in this example we have created this folder in "C:\Projects\12c\BPMDev\soamds". There is no constraint on the folder place but advice is to have all the folder name without any space. Now create a folder apps inside, this is required. 


2. Now open IDE connections in resources. If this window is not open then click on Windows -> Resources in jdev. Once its open click on new SOA MDS Connection.


3. Now give a name to the repository and browse the root folder of it.


4. Now you see the connection like given in the picture.


5. Now these artifacts are available to use, you can right click and add this repository to application.


6. Now these artifacts are available to use in the application.


7. Now create a BPEL or project .


8. For schema click on lens to select the schema.


9. Now click on import schema 


 10. Now select the schema and then you can select any type available from the schema.


12. Now select the type which you want as a input. 


13. If you see no schema is been create for the BPEL. Now if you see there is no schema created.


15.  If you see WSDL you can see a import from the oramds


 Before deploying this schema you need to deploy the MDS project to soa server. This is required because this application will not deploy schema from the project.  In next blog we will discuss how to deploy MDS schema to weblogic server.