Saturday 12 January 2019

Tor Brower - Unable to find the proxy server

Tor - Browser - Unable to find the proxy server


First of all congratulation to you, to at lest understanding the value of the data privacy and using a browser and system where you can be anonyms and still use internet. 

This is one common problem for the users using the tor browser first time. This issue is self explanatory, your browser need to connect to your system network to connect to internet. 


This is a quite common issue and you just need to correct your settings in the browser click on settings and open preferences.


Once you click on setting it will open the proxy settings here do 2 things

1. Change the setting to auto detect the network proxy.

2. Uncheck Proxy DNS when using SOCKS v5


 Click on save, hope you are able to view your site in Tor now.

Saturday 15 December 2018

OSB-382191 - body". Value must be an instance of {http://schemas.xmlsoap.org/soap/envelope/}Body

                OSB ERROR - OSB-382191


Failed to set the value of context variable "body". Value must be an instance of {http://schemas.xmlsoap.org/soap/envelope/}Body.
Failed to set the value of context variable "header". Value must be an instance of {http://schemas.xmlsoap.org/soap/envelope/}Header.

This is a quite common error when you start manipulating OSB generated variables like body, headers.  
    This error happen, because OSB have a structure for all the variables and in the above errors only come when structure is replaced with the value.  


  There is a simple error  and be easily removed using the . in the request. Which simply mean we are putting the . instead of no value.


   Other way to avoid this error is place the value 

   Expression

     <soapenv:Body xmlns:soapenv="http://schemas.xmlsoap.org/soap/envelope/"         
          <Value>Value to be assign to body</Value>
        </soapenv:Body> 
            Variable: body


Sunday 21 January 2018

For each activity

For Each Activity

Introduction
    
     In BPEL 2.0 FlowN activity is been replaced with the foreach activity.  This activity from the name work on a group of similar objects and process them each. Processing of the objects depends on choice made by the developer, it can either sequentially processed or it can also processed in parallel. Parallel some time considered as parallel and multi threaded execution in the JVM. While its not true, Oracle SOA is not a multi-threaded environment. Hence parallel just mean if first flow is waiting for answer it start executing the second flow but in a single thread.  Hence anyway it can never be actual parallel in true sense if we think in java terms. But still feature is useful let say we are executing a service to find information about a car 6 times and service takes 2 second to answer, hence instead of taking entire flow 12 second it may take 3-4 second only as during the wait other flows will be executed. 


Major Parts


1. Activity Name
Simple name of the activity, does not play any major role in the processing of the component. 

2.Counter Name
This is the self increased counter value,which keep on increasing once we do it for  

3.Start Value
This is the value of the counter when the activity is initiated, this is decided on run-time. You can have a static value here too.

4.End Value
 This is the final value of the counter, where loop terminate. 

5.Completion condition
Not mandatory but it will provide the  condition which will be considered as a completion of the activity. 

Parallel flow will give an indication to execution engine, if activity has to run in parallel or sequential.


Example :

Link to download.

Example we are discussing here is an simple example where we are giving a bulk data to a car system to execute and give us information on various aspects.  This example is kind of prefect case where 


Please download the example from the link, we are using hr database for the Database adapter, hence its advisable to configure the database before running the example.  Project also have file TableCreationScript.sql, this file will provide you table been used in the example and data inserted.


Design :-  This example take input of the car numbers in the array and process everything in one go go using a froeach statement. Foreach activity process entire array one by one and then put the result in other array.  Payload is provided in the folder with the project.


Working: Once you provide the payload given then it will take the payload and assign each of the result one by one and then process the entire set one by one.

   1. Provide input to the process, and select the payload from the folder given,


 2. Once testing is done click the Launch the Flow Trace.


3. See and analyse the flow happen post the foreach. It will give a view like its running in parallel. its not acutely parallel but its the best use of the resources. 


 Here Oracle SOA provide an alternative also where you can control the execution to sequential, this is to tell process engine not to start another iteration if one is not complete or in waiting state at any place.

Hence if your operation are fine to run kind of parallel,  This is the activity for you and check parallel execution if not then just un-check parallel and it will start behaving your pet sheep, one going after another.


Exercise : -
1. Make output variable of the db adapter global and check how it start behaving, i am sure you will get to know some idea behind it.


Sunday 5 November 2017

Custom Header in BPEL

Custom Header in BPEL


Some time we want to send process a message which is not part of the soap message, like an example we got a message(payload) from a accounting system and this accounting system want to send the information to next system(broker) to tell which is the customer to which this system has to call by the broaking service.

 There are multiple times situation may come that you want to pass the payload to another service but without modification but want some information to be passed. Cryptic, yes  but this can be done using the headers, hence we will not be changing the payload but sending the information in header.


Application Creation

 1. Open the jdeveloper and create a SOA application.


2.Name the application BPELCustomHederDemoApp. you can choose any of you name too but in that case please proceed with that name.


3. Now create a project inside the application I named it BPELCustomHeaderProj, you can have a name of your choice.

4. Create a empty composite, we will be adding component to it later.


5. Application will be created with in jdeveloper, once  you are done with the finish.


Schema Addition

1. Now add the schema file to the project,please create xml schema name with Eqity.xsd and then copy the schema from the project.


BPEL Creation

1. Open the composite and drag and drop a BPEL component from the component menu.


2. Now name the BPEL and  then took input as equity and same as output, we are creating it as request response (sync) process.


3. Once you finish it will create the BPEL and its calling service like given in the picture.


4. Open the wsdl file created for the BPEL and add a message in the WSDL name BPELHeaderMessage and say ok


5. Add part message to it and now select the processHeader to the message, name it payloadHeader.

6. Now click on bindings and create binding and just finish it. It will start reflecting in the wsdl file.


7. It will look like this once created.


8. Now open the wsdl and add header in the input and output of the BPEL process.


9. Once its been added and you open the wsdl in design mode it will look like below. 

10. Now open the BPEL and create the variable name inputHaderVariable and outHeaderVariable and add type of the element as given below.


11. Now things are created and in the receive edit it and then add the header variable as inputHeaderMessage variable, which is just created.

12 . Now add a assign activity and set the header of the instance. It will give us what is been sent in the header variable.


Test

1. Now start the server and deploy composite, please see my post for more information.  Once deployed open the test console and then open the composite for testing.


 2. You will be able to see header and payload variable in the test screen add some values as we are not validating the value anything is fine.


3. Now check the output and you will be able to see that header sting been assigned to string name. 


4. Last but not lest check the header variable and see the name there. it is there been set as instance name also.


Download the project from this location 


Activity :-

Change the XSD and make it to create an employee and send the company name in header.


Thursday 12 October 2017

JMS Adapter Demo

JMS Adapter (Draft)

Sun micro-system (now oracle) with several other technology companies has written down the specification for the Java messaging system. This include API for the message exchange and also specification for the message production and consumption.  On the top of it sun built the complete APIs in java for the JSM to use it.

It become a very favorable way of integration between the heterogeneous systems and also between the systems where communication is not synchronous.  Its also pawed the way of one to may kind of integration. Where one or many system wait for the producer system to notify the change and then subscribing system work and do the activity in its part.

In Oracle SOA suite JMS capability is inbuilt and it use weblogic server as a messaging container.  Hence its the weblogic queue or Topic which is used by SOA suite for the message transport.


I will take difference between queue and topics in the next post but here we will be learning how to use JMS adapter in SOA suite.


Application Process Creation


1. This adapter abstract all the complexity of the implementation of the JMS to developer. First create an application with the BPEL process. You can keep name as same or can change names. Use the xsd given for the input. I am sick of employee department model hence choosing a different one here.

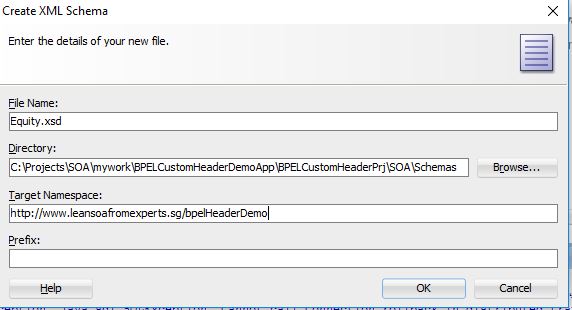
 XSD : download the xsd from the project url.


2.  Now add the xsd from the project given and then drop an BPEL component on the canvas.


If you are not sure how to select input use below screen to check.


3. Now the BPEL process will be created as given below and you are fine to create an adapter.


JMS Adapter Creation

1. Drag and drop and adapter from the BPEL components to SOA canvas.  it will start the Wizard for the JSM adapter creation. Give a name to the Jms adapter and say next.


2. Now choose the provider for the jms connection, in the previous chapter we created JMS connection on weblogic. Use that, for more information visit my previous post.


Skip Step 3 -
3) If connection to the server is not already created then it will invoke the other wizard to create and add a new weblogic connection for the JMS connection to use. 


4. Provide user name and password for the weblogic connection and click Next.


5. Provide the IP address or host name for the weblogic server and and click next.  


6. After testing the connection click over next and then Finish.


7. Now choose the application server connection. This is connection we need to first created in weblogic server.


8. Now for adapter interface that it will be defined later and choose next 

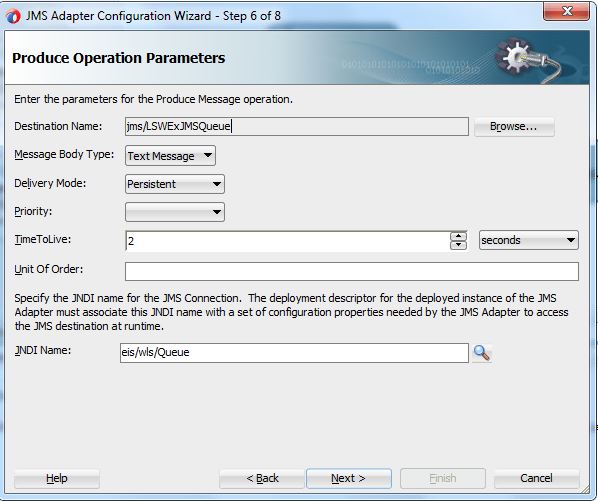
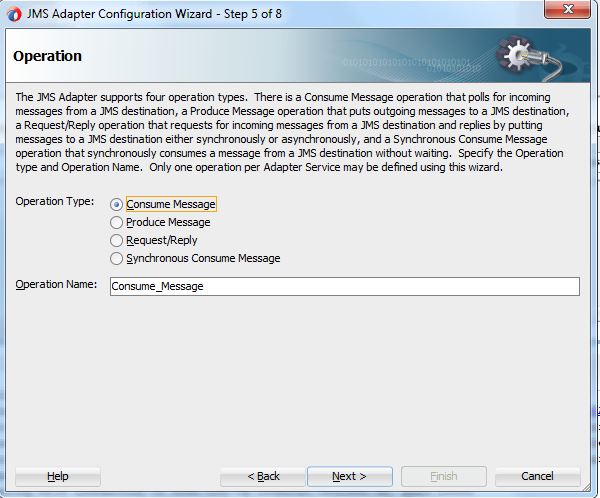
9. In this step JMS adapter will ask if you want to produce or consume the message, based on this other configuration will be created.  


10. Now we add the queue and name to message queue and click next. 


11. Now add the xsd, this is the same xsd which we have used to create the BPEL process, click next post that.


12  Now review the setting and finish it, it will create  JSM adapter in the background for you. 


13. Once adapter come on canvas join it with BPEL process, with wire it should look exactly same as given below.


Consumer JMS Services

1. Now we are creating one more  adapter this is for consuming the message been queued by the first adapter.


2. Name the adapter as given blow, please keep in mind we are creating this adapter for the message consumption, for the message created using the JMS adapter.

3. Select the provider as weblogic and click next.


4.. Now select the connection, this is same connection we created and selected in this exercise and click next. 


5.Now operation we are going to perform is Consume message select as required and then click next.


6. Select the queue which is going to be used and then click next. 

7.. Now choose the xsd, from the project, its expected structure of the message,  once selected click next.


8. Now click finish and then Jdeveloper will create the JMS adapter for you.


9. Add one more BPEL with the same input type and wire it with the consumer JMS adapter. Now deploy this composite on SOA server and your project is ready to test.


Testing of Composite


1. Go yo you composite and select it and click on it.


2. Click on the test service button and then input the parameter and click on test button. 

3.  Check the flow trace you will be able to see both consumer and producer.