BPEL Header and Config Parameters
BPEL Instance Headers
In BPEL we can see a name is always given to our instances. But to our ease of debugging we can provide a unique name or anything based on our requirement.
Lets think a BPEL process is executing an employee creation activity. Now if wont set any name it will be hard to debug and we need to open each and every instance to see which instance has created our employee.
Now we just set like 'Employee Creation For ' + name of employee as instance name then it will be easy for us search for this instance and we can easily find out during the debugging.
In the BPEL create an assign activity and then a small code can make your job. These are steps you need to take
Few things to be note down in 12c.
1. In oracle soa 12c there is bug, due to which ora:setCompositeInstanceTitle does not work. Its a known issue to oracle.
2. Oracle has given a patch for this issue and patch number is 20423408. You need to download this bulky patch and then need to run given below commands to run the sample.
Patching
1. Run the cmd prompt in admin mode. Set Oracle Home, for its in the 12cBPM folder
SET ORACLE_HOME=C:\Oracle\12cBPM\Middleware\Oracle_Home
2. Now set Opatch path.
SET PATH=%PATH%;C:\Oracle\12cBPM\Middleware\Oracle_Home\OPatch
3. Now go to the folder where you unzip your patch like i downloaded to the location.
C:\temp\patch\p20423408_121300_Generic\20423408
4. Now run the opatch command
opatch apply
Once done remove system folder in your machine and then start server.
ora:setCompositeInstanceTitle Deprecation
Oracle has depricate the function ora:setCompositeInstanceTitle and a new function oraext:setFlowInstanceTitle has come to replace it.
Steps to use.
1. Add a assign activity in your process. Double click it and then assign a function

2. Choose any ouput variable and assign a function to it and choose the function ora:setCompositeInstanceTitle() from the Advance functions.

3. Now use any variable inside the function, you can very much compare it as a System.out.println() give any string and it will set it as a instance title. I have chosen employee Name as title name.

4. To make it more meaningful you can concat different information for title like
oraext:setFlowInstanceTitle(Concat('EmpCreatoin For : ', $inputVariable.payload/client:customerName))
Now before running this process lets discuss one more topic which is small but very highly used in all the BPEL projects. This is about the config parameters.
Preference Variable
Preference Variable you can think about the program constants, as these are been used multiple times in our program, instead of hard-coding them in all the places we can create them in the composite and other places we can simple use them.Only issue here is these config parameters are on BPEL level not on composite level, Hence if you want to use same constants in two BPEL you have to declare them individually.
Now how to create a preference variable.
1. Open the composite and go the BPEL component and add the property, as given below

<property name="bpel.preference.ERROR_STATUS">ERROR</property>
<property name="bpel.preference.SUCCESS_STATUS">SUCCESS</property>
<property name="bpel.preference.TITLE">Employee Creation</property>
2. Now in BEPL any where you need these variables you can simple access using the ora:getPreference() method. Like you need to get the value of the title then you can simple write
ora:getPreference('TITLE')If we combine both then in our assign activity we can simply change .
oraext:setFlowInstanceTitle(Concat("EmpCreatoin For : ", $inputVariable.payload/client:customerName))
to
oraext:setFlowInstanceTitle(concat(ora:getPreference('TITLE') , $inputVariable.payload/client:customerName))
Hope you like the blog, we are happy to take your ideas to make it better.
Running
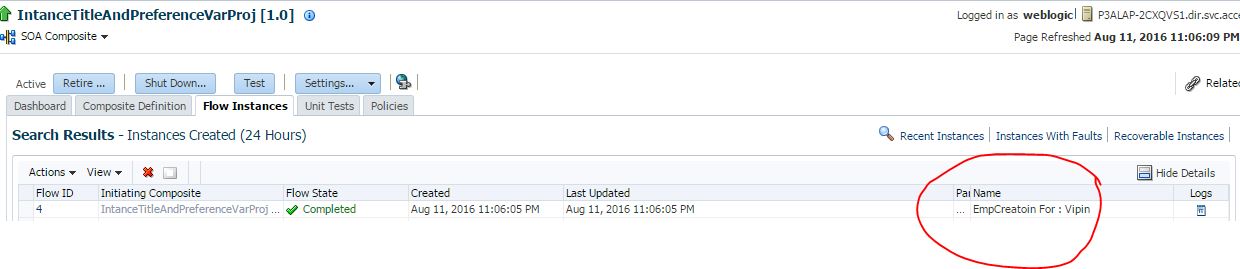
Now you can run the process to see the title and also, just provide any simple name for customerName and address and then you can see the instance title.
Download Example :
Download example from the link : Example
direct Link https://drive.google.com/open?id=0B13Nkwu-4qVDRkFUM20zbHl3aFE
Play
1) Create 2 more preference variable and set them as a title and see the deployment.
2) Create 2 preference variable assign values 5 and 4 and there multiplication assign to output.
Reference
https://cloudipaas.wordpress.com/2015/06/08/soa-suite-12c-patchset-20423408-soa-12-1-3-0-2-bundle-patch-how-to-apply-patch-on-windows/
Special Thanks
Ankur and Sagar to find me patch :-) and numerous suggestions.


